|
Button Mapping allows you to organize, reorder, and customize how products and categories appear on your Front of House POS system. This helps staff quickly locate items and improves the efficiency of sales operations.
🧭 Accessing Button Mapping
📂 Navigation
-
Open the Back Office
-
Go to Manage → Products
-
On the left panel, under Bar Functions, tap or click Button Mapping
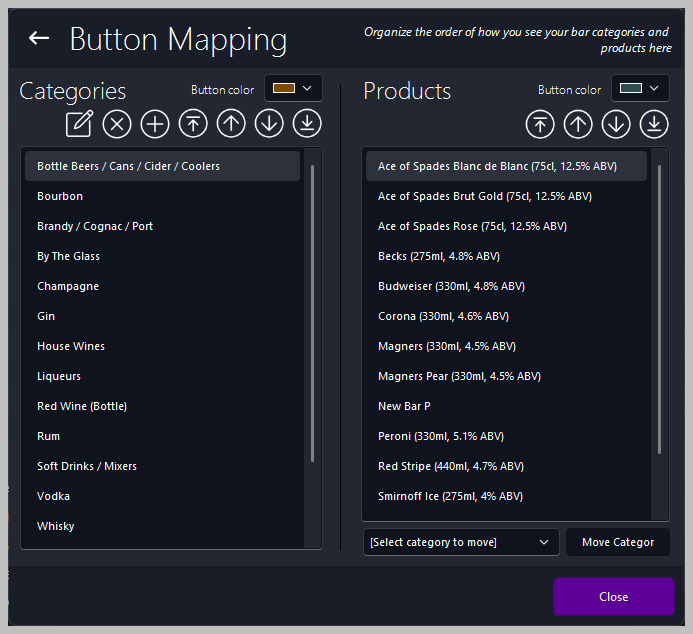
The Button Mapping window will open, displaying two columns — Categories and Products.
🗂️ Categories Panel
📋 Overview
The Categories panel lists all product groups available for sale, such as:
-
Bottle Beers / Cans / Cider / Coolers
-
Champagne
-
Spirits (Vodka, Gin, Rum, Whisky)
-
Wines
-
Soft Drinks / Mixers
⚙️ Category Controls
Use the icons above the list to manage category order and appearance:
-
Add New Category — create a new button group
-
Edit Category Name — rename an existing category
-
Delete Category — remove a category from the list
-
Move Up / Move Down — change the order of categories
-
Change Button Colur — assign a colur for easy identification on the POS screen
🛍️ Products Panel
📋 Overview
The Products panel shows all items within the selected category. Each product represents a button that appears on the POS system.
⚙️ Product Controls
Use the icons above the list to manage product order and visibility:
-
Add New Product — create a new product button
-
Edit Product Name — rename an existing product
-
Delete Product — remove a product from the category
-
Move Up / Move Down — reorder products within the category
-
Change Button Colur — assign a colur for quick recognition
🔄 Moving Products Between Categories
To move a product to another category:
-
Select the product
-
Choose the destination category from the Select Category to Move drop-down
-
Tap or click Move Category
💾 Saving Changes
✔️ Save Options
|

|
Tip
Use consistent colour coding for categories — for example:
This helps staff identify products faster during busy periods.
|
| ⚙️ |
Best Practice
Review your button layout regularly to ensure new products are visible and discontinued items are removed. A well‑organised POS layout improves speed, accuracy, and customer service.
|
|